Our toddler is at that age where she’s into everything.
Our youngest daughter is a champion climber. The wardrobe in her bedroom appears to have become an inviting ‘staircase’, so here are my top tips for securing furniture to keep your little ones safe.
Use L-brackets for fixing wardrobes or chests of drawers to walls
Often, furniture will come with brackets included but if not, you can get an L-shaped corner bracket from any ironmongery or DIY store. Try B&Q’s silver zinc-effect mild steel corner brace brackets (£7.74 for a pack of 20).
They may also be referred to by a few different terms, such as L-bracket, corner bracket or corner brace. Some will come with screws included, otherwise ask for help where you’re buying it to make sure you get the right sized screws to go with your bracket.
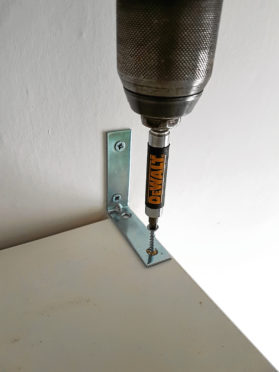
Get the right tools for the job
For this project, you’re going to need an electric drill with a 5.5mm masonry drill bit and a Phillips screw head, screws, a Phillips screwdriver, a pencil, a step-ladder, a spirit level and Rawlplugs (the red ones) if it’s going to be attached to a brick wall.
First, you need to establish whether the wall you’re fixing it to is a brick wall or if it’s a stud wall – an internal wall that sounds hollow when you knock on it.
Next, you’ll need a drill. For under £100 you can pick up a fantastic Dewalt cordless drill for all your household needs.
Make sure your wardrobe is level before fixing to a brick wall
For added security, I like to use two brackets, even if it’s a small wardrobe – one at each end. Push your wardrobe into position, as far back against your skirting boards as it will go.
If the wardrobe still tilts forward, for example because a carpet gripper-rod at the edge of the room makes the back legs a little higher, then prop up the front legs of your wardrobe with a small bit of plywood under each leg, cut to size, or even some folded cardboard. Use your spirit level to check the top of the wardrobe is level. Climb up your step-ladder to the top of the wardrobe and you’ll see the back of the wardrobe should be the depth of the skirting board away from the wall.
Put your bracket in position and use your pencil to draw the shape of the hole on to the wall. When you move the bracket away, draw a cross through the circle, so that you can still see where the centre is while you drill the hole. Set your drill to high-speed hammer setting. As you drill, hold the end of a vacuum nozzle as close to the hole as possible. You may need another pair of hands to do this job, but it’s very useful to vacuum-away the dust as you work. You don’t need to drill into the wall to the full depth of your drill-bit, only as deep as the Rawlplug, plus around 5mm extra.
When you’ve drilled your holes, insert your Rawlplugs, put your bracket in place and then with your screwdriver, secure the brackets to the wall by hand with your screws. Once this is attached to the wall, you can screw down into the top of your wardrobe using your cordless drill on screwdriver setting, or you can do this by hand.
For a stud wall, find the wooden studs for a stronger fix
In most modern homes, a stud wall is plasterboard fixed to a wooden frame and then plastered over. If you were to follow the instructions above and drill into plasterboard, this wouldn’t give you a strong enough fixing.
Instead, you need to find where the wooden studs are in the wall and screw your brackets into these. To do this, tap along the wall with your knuckles and listen out for when the hollow sound changes to a hard sound – that will be where the wooden studs are. With a stud wall, you’ll need to put the brackets where they can be screwed into the wooden studs, so it won’t necessarily be at either end of the wardrobe. For this reason, as well as wall screws, you’ll also need short 16mm screws (so they don’t poke through inside the top of the wardrobe). Follow the steps above, but instead of drilling into the wall and using a Rawlplug, use your drill to screw directly into the wooden studs.
Toddler-proof wardrobe doors and drawers while you’re at it
While you’re toddler-proofing, you might also want to think about adding some safety catches to your drawers or wardrobe doors, to stop your little one trapping their fingers. Dreambaby Safety Catches (£7.99 for a set of 12, Argos) are readily available, and very easy to fix by hand or with your cordless drill.